HWD POS mobile
The tablet app for the counter, for iPad and Android - customers sign credit sales by scanning the register's QR, and the camera reads barcodes. It also runs on phones.
HWD POS mobile is made first of all for a tablet at the counter: an iPad, or an Android tablet. Its two main jobs are:
- The customer signs credit sales on the tablet. The register shows a QR; the tablet scans it and shows the customer the document to review and sign, without anyone signing in.
- The camera reads codes. Product barcodes go straight into the search, and the QR codes the register generates open their page.
It opens the same HWD POS screens, so the tablet also works as a POS for lookups and quotations. The same app runs on Android phones and iPhones, with the screens adapted to the smaller size. This page covers version 1.0.4 of the app with HWD POS 1.0.27. The screenshots are from an iPad in landscape; on an Android tablet the screens are the same.
It needs a connection
HWD POS mobile doesn't work without connection to the server: it doesn't save sales, quotations or signatures on the device. If the connection is lost, it shows a message and waits. For deliveries without signal use HWD POS Delivery.
Requirements
- An iPad with iPadOS 13 or later, or an Android tablet. It also runs on an iPhone with iOS 13 or later and on Android phones.
- Connection to the store's network (Wi-Fi), or to the server's public address if you have one.
- A rear camera, to read the activation code, barcodes and the signature QR.
- For employee cards: a device with NFC. iPhones have it; iPads don't; on Android, it depends on the model.
Activating the tablet
Install the HWD POS app provided by 3R Soft and open it. The first time it shows the activation screen.
With the QR (recommended). An administrator generates an activation code in «Terminales» (activation codes). A name that says where the tablet is helps, for example Tableta mostrador (counter tablet).
- Press «Escanee para activar el dispositivo» (Scan to activate the device) and allow the camera.
- Point the camera at the QR shown on the computer.
- If the code didn't include a name, the app asks for «Nombre del dispositivo» (Device name): type it and press «Activar» (Activate).
The app takes the server addresses from the code and opens the POS sign-in.
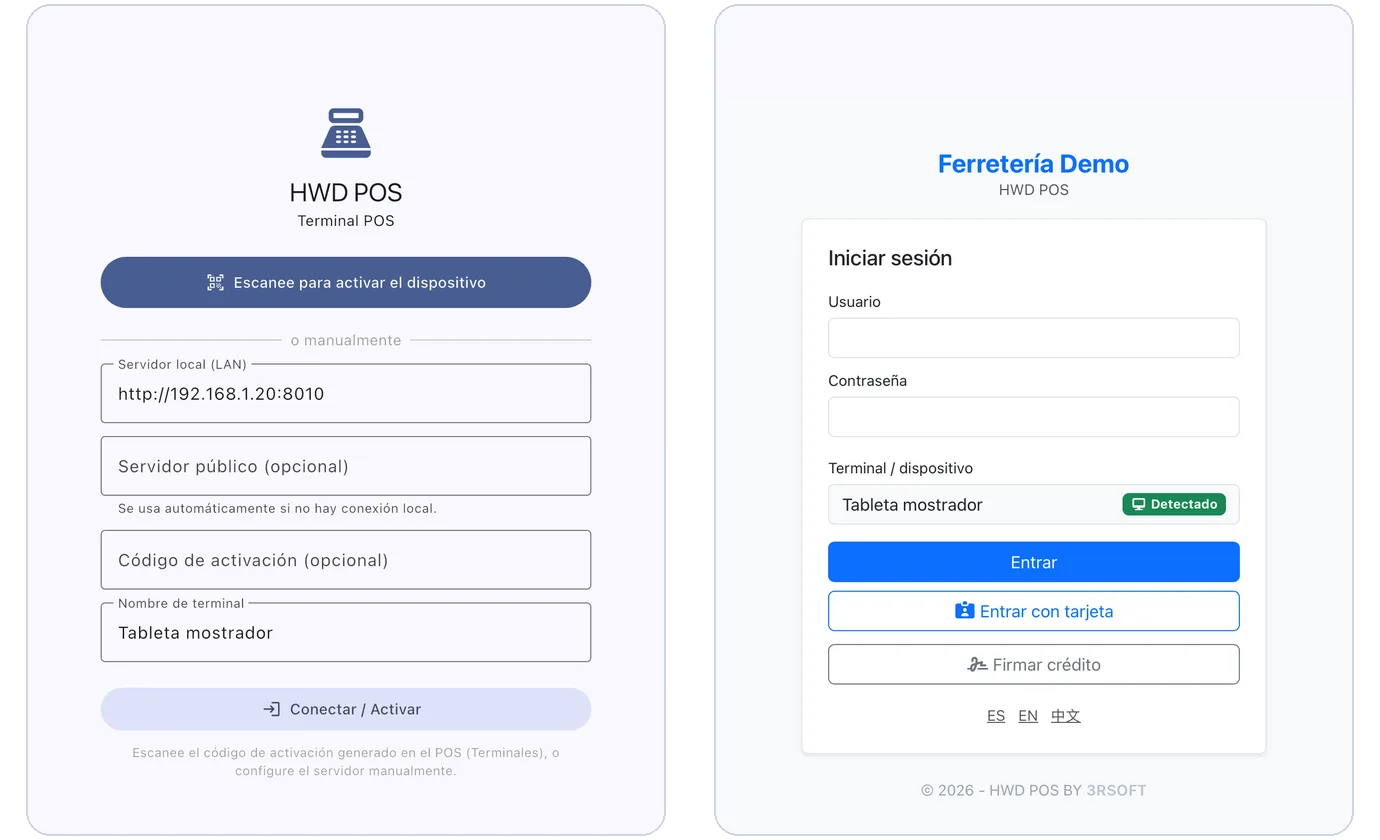
Left: the activation screen. Right: once activated, the sign-in with the tablet detected and the «Firmar crédito» button.
Manually. If the camera can't be used:
- Type «Servidor local (LAN)» and, if you have one, «Servidor público (opcional)».
- Type the code in «Código de activación (opcional)», in the form
ENR-XXXXXXXX-XXXXXXXX. - Type «Nombre de terminal» (Terminal name) and press «Conectar / Activar» (Connect / Activate).
Without a code, the app connects to the server but this device is only registered as a terminal if the administrator has turned on automatic registration.
On an iPad or iPhone, the first time iOS asks whether the app may find devices on the local network: answer Allow. Without that permission it can't reach the store's server.
The sign-in screen
The sign-in screen already shows the tablet with «Detectado» (Detected). From here you can:
- Sign in with user and password, or with «Entrar con tarjeta» (Sign in with card) on a device with NFC (below).
- Press «Firmar crédito» (Sign credit) to collect a customer's signature without signing in (next section).
«Firmar crédito» only appears inside the app, because it uses the app's camera reader. In a web browser the button isn't shown.
Customer signature for credit sales
The register charges as always and shows a QR; the tablet reads it and shows the customer the document and the box to sign. The cashier doesn't turn the screen around and the customer doesn't touch the register.
Setting it up (once)
An administrator turns it on in the POS:
- In «Configuración» → «Configuración», box «Ventas / Impuesto» (Sales / Tax), set «Modo de firma (crédito)» (Signature mode, credit) to «Firmar en nuestro móvil (escanear QR)» (Sign on our mobile device, scan QR).
- Choose which customers sign. On the customer's page, «Evidencia de crédito» (Credit evidence) can be «Firma» (Signature) or «Foto + Firma» (Photo + Signature). Customers left on «Predeterminado (global)» (Default, global) follow «Requerir evidencia en ventas a crédito» (Require evidence on credit sales) in the same «Ventas / Impuesto» box, which asks for a photo or a signature.
Signing a credit sale
At the register. In the payment screen choose «Crédito» (Credit) and press «Solicitar firma por QR» (Request signature by QR). The QR appears with «Esperando firma…» (Waiting for signature) and a 5-minute countdown.
On the tablet. On the sign-in screen press «Firmar crédito» and point the camera at the QR. Nobody signs in on the tablet. If someone is already signed in on the tablet, the scan button of the search box opens the same signature.
The customer reviews the document. The tablet shows «Firma del cliente» (Customer signature): on the left the document, with the customer, the products, quantities, prices and the total; the magnifier buttons enlarge it.
Photos, if needed. On the iPad, «Tomar foto» (Take photo) opens the camera: the signed receipt, the ID or the goods. Each photo is saved at once; tap a thumbnail to see it or «Eliminar» (Delete) it before signing. Up to 8 photos.
The customer signs. They sign with the finger in «Firme aquí» (Sign here), write their name in «Nombre de quien firma» (Name of the signer), which is printed under the signature, and press «Confirmar firma» (Confirm signature). «Volver a firmar» (Sign again) clears the box.
Back at the register. The tablet says «Firma enviada. Puede volver a la caja.» (Signature sent. You may return to the register). At the register the QR blurs with a green check and «Firma recibida» (Signature received) appears at once. Finish with «Cobrar» (Charge).
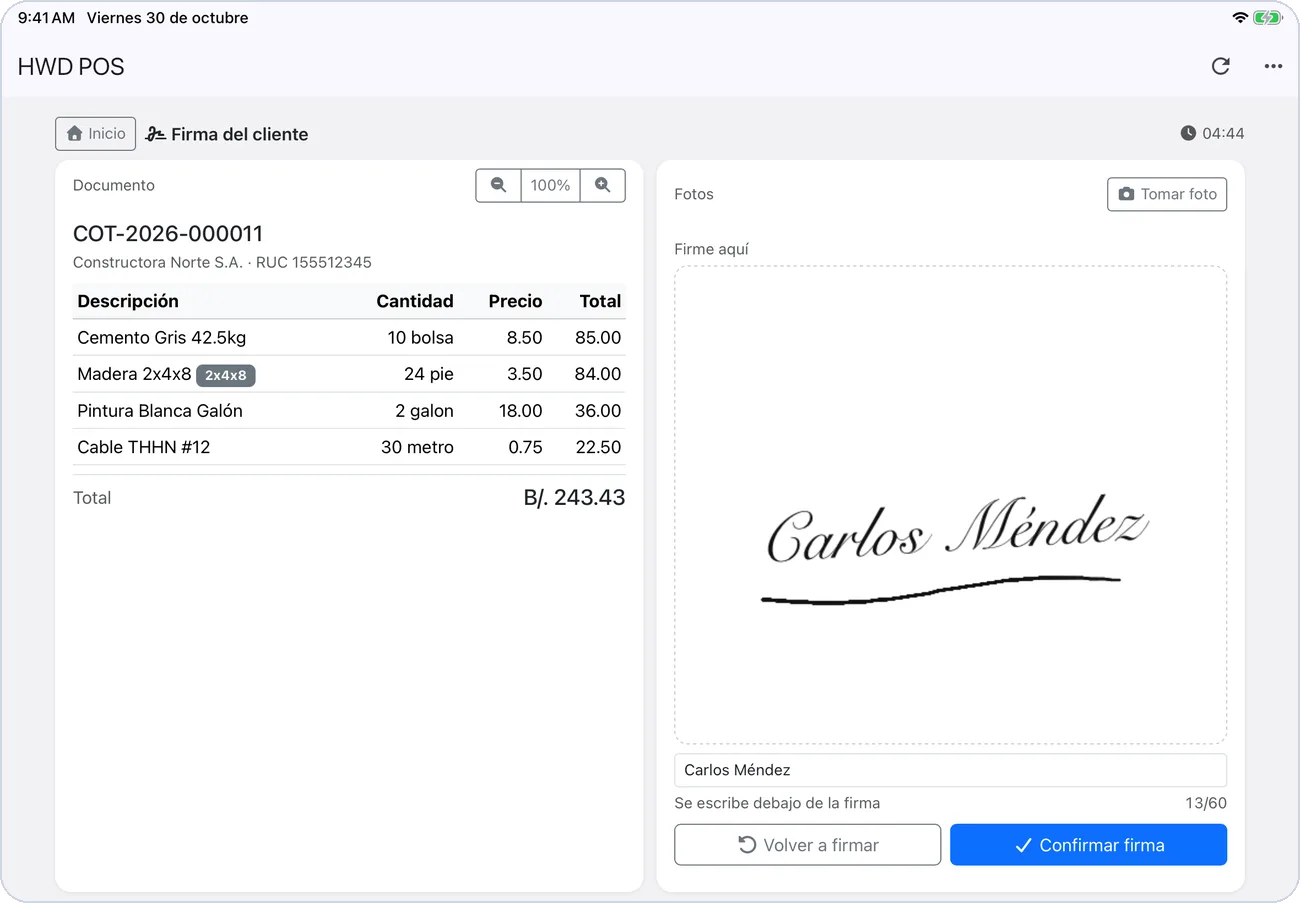
The tablet with the document on the left and the signature with the name on the right.
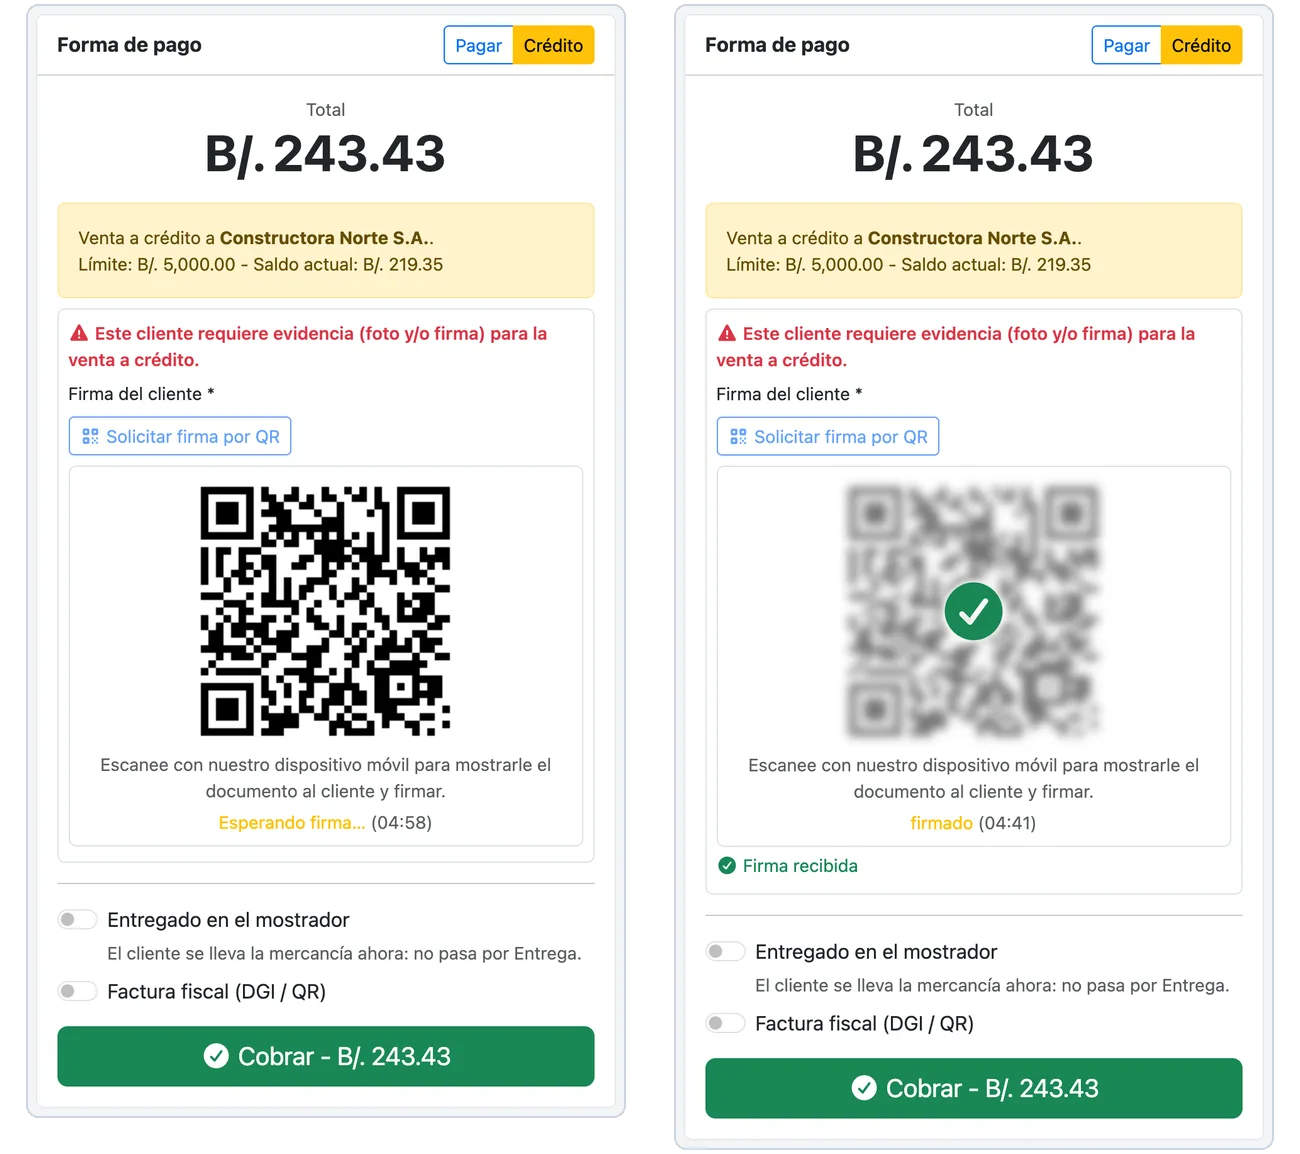
The register: left, the QR waiting for the signature; right, the signature received.
«Inicio» (Home), at the top left of the tablet, goes back to the sign-in screen, ready for the next customer.
Good to know:
- The QR is single-use and lasts 5 minutes. If it expires, the tablet shows «Código vencido» (Code expired): press «Solicitar firma por QR» again at the register.
- The signing screen only shows that document. It gives no access to the rest of the system, so the tablet can stay at the counter without anyone signed in.
- The signature, the name and the photos are kept with the credit (credit with signature).
Scanning codes with the camera
When someone is signed in, the barcode button at the right of the search box opens the camera, with «Linterna» (Flashlight) to light the code:
- A product barcode (Code 128, EAN, UPC and similar) is searched straight away, as if it had been typed.
- A QR generated by HWD POS at the register, such as the signature QR, opens its page.
- Other QR codes are ignored.
Using the POS on the tablet
After signing in you see the same main panel and menus as on a computer, according to your role (user manual).
The bar at the top shows the name of the system (with «Remoto», Remote, when it is using the public address) and two buttons:
| Button | What it does |
|---|---|
| Reload (circular arrow) | Reloads the current page. |
| ⋯ → «Inicio POS» (POS home) | Goes back to the start of the POS. |
| ⋯ → «Reconfigurar terminal» (Reconfigure terminal) | Goes back to the activation screen, to change the server. |
On Android, the back button goes back to the previous POS page.
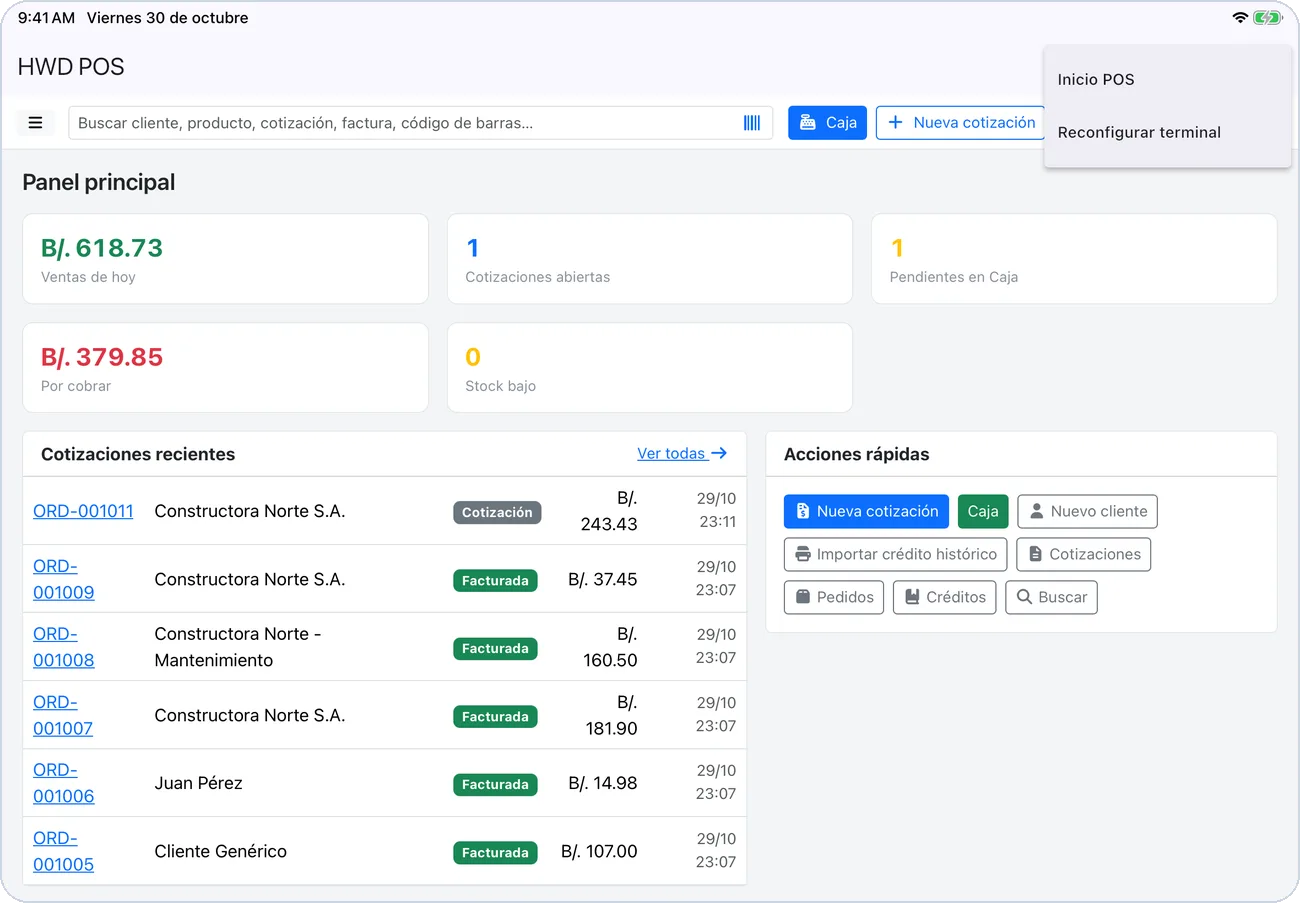
The main panel on the tablet: the scan button in the search box and the ⋯ menu open.
On a phone
On an iPhone or an Android phone the app is the same, with the screens fitted to the narrower screen. It is handy on the sales floor for lookups and quotations, and it can also scan the signature QR. For the customer to read the document and sign comfortably, use a tablet.
Employee cards with NFC
On a device with NFC, «Entrar con tarjeta» (Sign in with card) asks you to hold the card to the back of the device; on an iPhone the system window for reading appears. The device keeps no card key: the server does the work and the device only passes the messages to the card. The administrator manages the cards from the POS (employee cards).
Without connection
If the server stops answering, the app first tries the other address (public or local). If neither answers, it shows this screen:
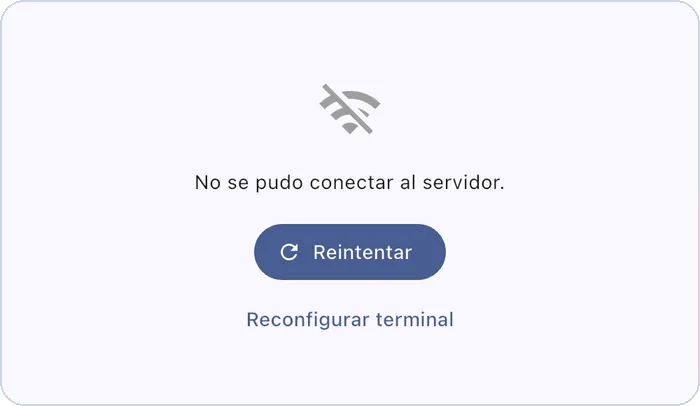
Without connection: «Reintentar» and «Reconfigurar terminal».
Press «Reintentar» (Retry) when the connection is back. Use «Reconfigurar terminal» only if the server address changed.
Common messages
| Message | What to do |
|---|---|
| «Código de activación inválido.» | The code was mistyped, or it doesn't belong to this server. |
| «Este código ya fue utilizado.» / «Este código expiró.» / «Este código fue revocado.» | Ask the administrator for a new code. |
| «Ya existe un dispositivo con ese nombre.» | Choose another name. |
| «No se pudo conectar al servidor indicado en el código.» | The tablet can't reach the server: check that it is on the store's Wi-Fi (and, on iOS, the local network permission). |
| «No se pudo conectar a ningún servidor (local ni público).» | Neither address answers. Check the addresses and the connection. |
| «Se alcanzó el límite de dispositivos.» | The license has no free places (license limit). |
| «Ese código no corresponde a una firma. Vuelva a escanearlo.» | «Firmar crédito» read something that isn't the signature QR. Scan the QR on the register. |
| «Código vencido» | The signature QR passed its 5 minutes. Request a new one at the register. |
| «Documento firmado» | That QR was already signed. If another signature is needed, request a new QR. |
| «Por favor firme antes de confirmar.» | The signature box is empty. |
| «No se pudo enviar la firma.» | The signature didn't reach the server. Check the Wi-Fi and press «Confirmar firma» again; if the QR has expired, request a new one. |
| «Permiso de cámara denegado…» | Allow the camera for HWD POS in the device settings. |